Showing posts with label Undergarments. Show all posts

1885-1887 Cotton Corset

Along with working on Harriet's gown, I am going to be doing a living history presentation at the Athens County Historical Society in February. For the living history project, I am going to interpret for a middling class seamstress, as Harriet was. I have no garments suitable for the time period so I have to make them all.
Cotton American Corset, ca1885-1887Metropolitan Museum of Art
I have decided to undertake reproducing an American cotton corset from the 1880s. This corset is on display at the Metropolitan Museum of Art and I fell in love with it on the first glance. I love the blue tambour-work on the front panels. It is from a little earlier than when Harriet made her gown, but it's safe to assume that being in "rural Ohio", even with Ohio University, that everyday styles were a little behind (probably no more than 5 years) for practicality reasons.

The only measurements given by the Met are the corset being 13.5" long at center back. So I decided to make it my own measurements, which are: 33" Bust, 28"Waist, and 35"Hip. My other corsets bring me down to a 23-24" waist, but it's sometimes uncomfortable because the smallest measurements result in complete closure at center back. I also know I could go a couple inches more (with proper training of course)

So, this corset will keep the same silhouette as the original garment, while allowing there to be some wiggle room for my waist sizes. Here was my process: I decided what size I want my waist to be at its smallest; I chose 22". Then I deducted around 2.5" from all my measurements (with the new waist measurement) to allow for whatever room between my laces that I want to maintain. This made the measurements of my corset to be ridiculously small: 30"B, 19"W, 32.5"H


Pretty Pattern Pieces
 I flat patterned the corset, using Corsets: Historical Patterns and Techniques and Corsets and Crinolines as visual reference. ^Here are my pattern pieces looking all pretty^

I hadn't been able to find twill fabric in the color I wanted for a good enough price, so I improv'd. I found a pair of $3 Goodwill khakis (size 12) and went from there.


yay $3!
You can kinda see the nestling I did with the pieces.
After the pieces were drawn onto the fabric, I did some embroidery. I did tambour work using a doily hook.
"Tambour"
Then I put some pieces together!

I wasn't able to keep the exact number of bones or cording channels as the original, mainly because I think the one I'm making is significantly smaller than the original. The overall effect of the corset seems to be on the right track, but we'll see when I have the front and back pieces in. My busk hasn't come in yet, and I've not made the grommets in the back piece. But here are some pics of my progress:
Woo back!
The Front!
(and only held together with the waist-tape)

Bodiced Petticoat: Finished.

Finally, I'm getting around to posting this! I finished my hand-stitched petticoat right before Christmas and took pictures on Christmas day. I'm set with the undergarments and am ready for the real dressmaking now!
side view
me being goofy
ick, I look very ticked off. but here is the front.
Back view

The entire garment is stitched by hand and made of a white cotton bedsheet from a hospital which was bought from a thrift shop.

In Progress: Late 1790's Bodiced Petticoat

Well, I'm not entirely sure that it's 1790's but the overall outfit will be. I started this project on Monday and have spent many many many hours in my sewing room trying to finish it so far. It is made out of a bedsheet from a hospital:
kinda spooky...
The sheet cost me $1.50 from a thrift store and had more than enough fabric to do the job. The bodice is a modified stays pattern, lined with the same bed sheet and is entirely hand-sewn. The skirt is attached only with pins at the moment...
Front Bodice
The best pic of the side I could get
It will have a waistband, to bring the bulk of the gathers down a bit, for a smaller waistline. I also didn't notice that the bodice of my petticoat is smaller than my stays until looking at the pictures for this post. :-/ Oh well I guess. Anywho, that's my progress!

Regency Short Stays, finished.

I recently finished my short stays and I am pretty pleased! This is the first time I've only done an entire hand sewn garment. GO ME!


Pattern: It is a self drafted pattern based off of the Sense and Sensibility "Regency Underthings"
Fabrics: I have no clue what the outside fabric is, but it is like canvas. The binding is the same "canvas-y" fabric. They are lined with muslin.
Other Materials: 14 Zip-ties for boning, hand quilting thread
Time: Patterning, 20 min. Fitting the gussets, 2 1/2 hours. Sewing, MANY MANY HOURS. Binding, 6 hours.
Stitches: Mainly saddle stitches, except the binding.
Cost: $2 mystery fabric + $1 muslin + $1.50 thread + $2 zip ties= $6.50 total.

Here's some more pics and then I'll talk more about it.

Sorry again.
What I like:
It is amazingly comfortable. It is quite effective. It was a relatively fast project (if done by sewing machine). It was relatively easy, being my first run with gussets. It has a pretty back. Some of my stitches turned out fabulous, after I got the hang of it.
What I'm okay with:
It's an odd color of creme. There's some puckeryness around/on the gussets. Ironing took a while to navigate the zip-ties/bones.

What I would do different:
I would have used 3 layers of fabric, to prevent the puckery. Used a fabric that I could identify. I would have made it a little smaller. Make sure that the front was even (it goes slightly downhill on the right side).

What I'm going to do: 
I plan to do some flossing on the stays in a light blue or just a white, but I'm still not sure how accurate that would be?

Some pretty stitches

Thanks for reading!

18th Century Under-Petticoat


Yet another addition to the 18th century pool... This is an under-petticoat worn over the bumroll. Here ya go!


Ingredients:

2, 72''wide White Curtains purchased at a thrift store
Thread
something for ties

Cost:
$3

Time to prepare:
2 hours


I chose to use curtains because they are already hemmed and I happened to come across a pair of lightweight, cream ones. This petticoat has 2 ties, to be tied on each side of the hips.

First I measured from my waist to how long I wanted my petticoat to be, about 37'' for me. I then measured from the bottom (already hemmed) part up to the disired length. You cut the whole bottom off of it from there. You need to do this twice to get a nice full petticoat. The width of the curtains were 72'' so my petticoat's circumference is 144''.

From there I took the sides and pinned them overlapping eachother, zigzag stitching from the bottom all but 6'' at the top (on both sides), to keep the petticoat smooth.

For both the front and back, the fabric needs to be gathered to the centermost part of each tie, leaving enough on each end to tie to the other portion. Sew that down and finish with whatever method you see fit. I just surged the tie to the fabric and was done with it.


Again, this is another AMAZINGLY THRIFTY thing to do that took no time at all! :) It makes me so happy

Bumroll

So, right now I have this crazy itch for 18th century stuff... so I'm busting out things left and right and having fun doing it. :)

note: A bumroll is another undergarment used in the 18th century. It was used to give the illusion that a woman had larger hips and rear, a sign of fertility (so they say).

Here's my bumroll and how I made it:


Ingredients:
1 Old Pillow case
21 plastic bags
Thread

Cost:
$0

Time to prepare:

45 min.

I got my idea from this site on how to measure it. It says to take a measurement of your hips, and take away 4 inches. This measurement (28 inches in my case) is what the inner oval shall be. From there I modified because the lady who makes this is 5'11'' compared to my 5'2'', and I would have looked ridiculous on me. At the very back of mine, I measured 5'' from the center oval. On the sides, 3'1/2''. Then you just connect the dots to make the crescent shape


then you cut it out:


then sew it together according to the directions on the site and stuff with your plastic grocery bags:


sew up the opening and add ties:


TAAAADAAAAA!!!!! bumroll.


This was totally easy and thrifty and I like it :)


18th Century Stays


I have always wanted an 18th century Stays(as they were not called corsets until the 1800's) and on Friday, I just decided I was going to make'em.

Ingredients:
13 eighteen-inch Heavy Duty Cable ties
52ish fourteen-inch zip ties (regular strength)
1 1/2 yards of canvas material (for me)
1 1/4 pkg of double fold bias tape
thread

Estimated Time:
took me 15ish hours (over 3 days time)

Cost:
$21

I started with this 
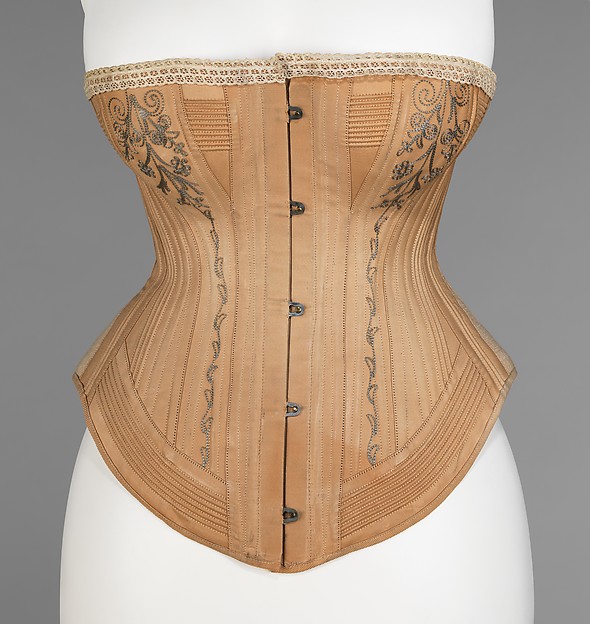
handy dandy site called the Custom Corset Pattern Generator. This site is for Elizabethan corsets, but I had a plan: The basic shape of the Elizabethan stays and the stays from the 1700's are pretty much the same. I put my waist measurement as 2'' smaller than I am, from 25'' waist to 23'' and used the pattern generator for the basics of my pattern and customized my pattern further by looking after this diagram that I found somewhere on the internet. The bone channels were derived from this picture to give a more "18th Century Look". I also added straps, tabs around the bottom, and a rounded bustline to the generated pattern to make it more like the pic.

(if this is your photo and would not like me to use it, tell me, and I'll get rid of it)

My pattern ended up looking like this:


The blue lines are for the heavy duty zip ties, while the red lines are for the regular ones

After cutting out my fabric I sewed the necessary channels for the bones (as indicated above). This didn't take too long, as you're sewing straight lines. But, the hard part came when the ties were ready to be put in... In order to guarantee that the cut cable ties won't pierce through your corset while you're wearing it, they need to be dulled after they're cut. This is most easily accomplished by burning the ends. BUT this stinks something terrible, so by all means do it outside!
After I finished with that horrible ordeal, I inserted them where they are supposed to be.

So my stays were pretty much done by that point, only the bias tape, straps, and eyelets needed to be finished. I sewed the straps on by machine, but the rest I did by hand. It took a long time but I'm glad I did it.

I now have to repair one of the bones from the back of the stays b/c as you can see it popped out of place:


I'm very happy with how this turned out... and fortunate to have had these sites for help:
ElizabethanCostume.net
18th Century Stays
Mara Riley
La Mode Historique

If ya got any questions... just Holler!