Pages

Cloning Oneself

Another project I have been working on is a clone-dress form. I think I made it a wee bit too complicated, but I can show you what I did.

Materials so far:
2 rolls of duct tape
1 Cheap segmented floor lamp ( I got mine for $10 at Oddlots)
6 canisters of insulation foam (buying a bunch of polyurethane foam would probably be cheaper)
1 old shirt
2 pieces of wood
1 empty toilet paper roll (jut the cardboard middle)

To start, I covered myself in duct tape, with the help of this tutorial.
This is an earlier dress form of me in a corset.
After my mom cut the duct tape off me, we made an internal structure to support the dress form's shoulders and to help it stand straight. The T is two pieces of wood drilled in a T. The tall part was drilled out in the center and a segment from the lamp is glued into the hole. The T went inside the duct tape shell with the top of the T in the shoulders and the insulation foam is sprayed in to keep it secure. It was really hard to make sure that the T didn't stray from the center. Since the T is meant to screw onto the stand it needs to be as straight as you can make it.

The foam had to be done in sections to fill everything out. Before I did the final foaming, I added the TP roll (picture below). After the foam finally dried I traced the bottom of the form onto some cardboard, cut a hole for the toilet paper roll then duct taped it all in place.
I taped the TP roll to the lamp segment then filled it the rest of the way with foam.

The form is slightly bigger than I am b/c I've lost a little weight since the taping. But a little extra room can't hurt! lol

That's what I've done so far. I plan to cover it with some batting and muslin when I get a chance. But until classes are over, it must be put on hold.

Batiking process

I'm working on a batik wall-tapestry thing for my Painting and Dyeing Fabrics class. We were allowed to choose really anything we think we could accomplish. I chose a wall-hanging in shades of blue.

For those of you who are not familiar with Batik, it is a process of layer-dyeing fabric with a "resist" that prevents the dye from getting to the fabric. For Batik the resist is a wax that is applied to the fabric with a brush or tjanting. I used a mix of paraffin and bee's wax that's available at Dharma Trading Company.

To start I sketched my picture onto the fabric then treated it with a soda ash/water solution (to help the fabric take the dye) and is stretched onto a frame after it has dried. Next, I added the wax to the places that need to be white. I used the tjanting (a heated pen-like tool that enables for smaller, finer lines of resist)
Now that there is ample resist, the first light layer of dye is added. Another layer of wax is added once the dye is dry.

The last dyeing is a very dark indigo. In order to make sure that the color stays dark, we were told to cover the wet-dyed fabric with plastic wrap. All I could find was a trashbag, so that's what I used.

When I finally got to this point I realized I was covered in blue dye. I have blue splashes on my shoulder, stripes on my arm and my fingertips were completely blue. I guess it's good to I look like I was doing something artsy, eh?

There are a few more steps yet to get this project to it's final stage. I will keep ya posted on what's to come!

The New Kid in Town


 Virgil is now a daddy of 6. There were 3 boys and 3 girls. All the girls being parti-colored Salt and Pepper, and the boys, one parti-color salt and pepper and two mini-Virgils. Since he is the papa, I got the pick of the litter. I have always found the smallest runts and most pathetic looking pups are quite simply the cutest. So, I picked the runt. :) They are all now 7 1/2 weeks old.

 We have yet to name her, since we are unsure if we will keep her or not (My parents say that we will avidly try to find a home for her, and if we cannot, we will keep her)
My mom looking all adorable :)
The First Haircut!
Virgil and his daughter
What would you name her if you could keep her? I like Josefine or Elsa.

Painting and Dyeing Fabrics Class

In one of my classes we are learning different techniques regarding changing fabrics colors/patterns/etc. I have so far, learned how to do:
            1) Hot Process Dyeing (and color matching)
            2) Stamp making
            3) Stencil making
            4) Screen Printing

Here are my finished projects
Who is your daddy?  
The above image will be on a shirt very soon. I've wanted a shirt with this image on it since I was 14 and I can finally have it! YAY!!   I was able to freehand this by looking at a photo of Darth Vader by only drawing the negative space (what would eventually be white in the stamp). I believe it turned out pretty alright ;)

This is my stenciling. The original design was a Slipper Pattern from Peterson's Magazine, 1864. I repeated the pattern to make a pretty border. Here's the original image of the slipper image:

The latest thing I've done is screen printing. I decided to do another image from Peterson's Magazine. I chose a fashion plate, that I find gorgeous.
My version ended up being this:
Hopefully soon, it'll be on a shirt too! I really like this image.

My next project for the class is batiking. I found a really pretty batik wall hanging picture that I'm going to try to recreate. It should be done next week. We'll see how it turns out :)

Finished Boba Fett Helmet

a serious pic i suppose?

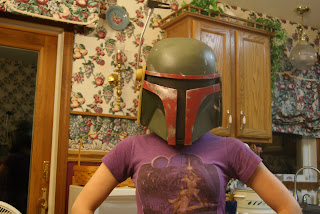
It's finally here! The finished Boba Fett helmet....I totally got an A on this project :)

And now....... process pics!
          *Before this pic was taken I had done the following to get it there:
                   1) Cut from foam 6 ovals, glued them together, finished carving to get the mold correct
2) Fiber-Glassed the whole thing with Aqua-Resin
                   3) Cut the cheek-indent things with a jigsaw (SCARY), inverted and reinserted them
   Et Voila!
I then finished the T with the jigsaw, added foam to the front and band around, added bendy-plywood to the sides, then rigged an old computer speaker to make the sight adjustable.
 Then added paint primer:

For the next step, I found the most amazing color of spray paint for the helm... Italian Olive Green. Next was the burgundy to the front
then the details! (my favorite part)   I specifically made it a 'pre-Empire Strikes Back' Boba Fett helm. There is no dent in the helmet, and not all of his battle scars are there, I wanted it that way :)


and now, my vanity shots:
Man-Pose
 and a cheesy smile!
...peace... 
 Sexy-Gun-Pose

Sorry for the Delay,

I have been without internet for quite some time (about a month) and we aren't exactly sure how long it will be until we get it back again. It seems I have a lot more thing to blog about when I don't have internet than when I do!

At the moment I don't have enough time to post anything but I'll give you a few pictures to give a taste of what's to come. Enjoy!


And there's a lot more where that came from!